
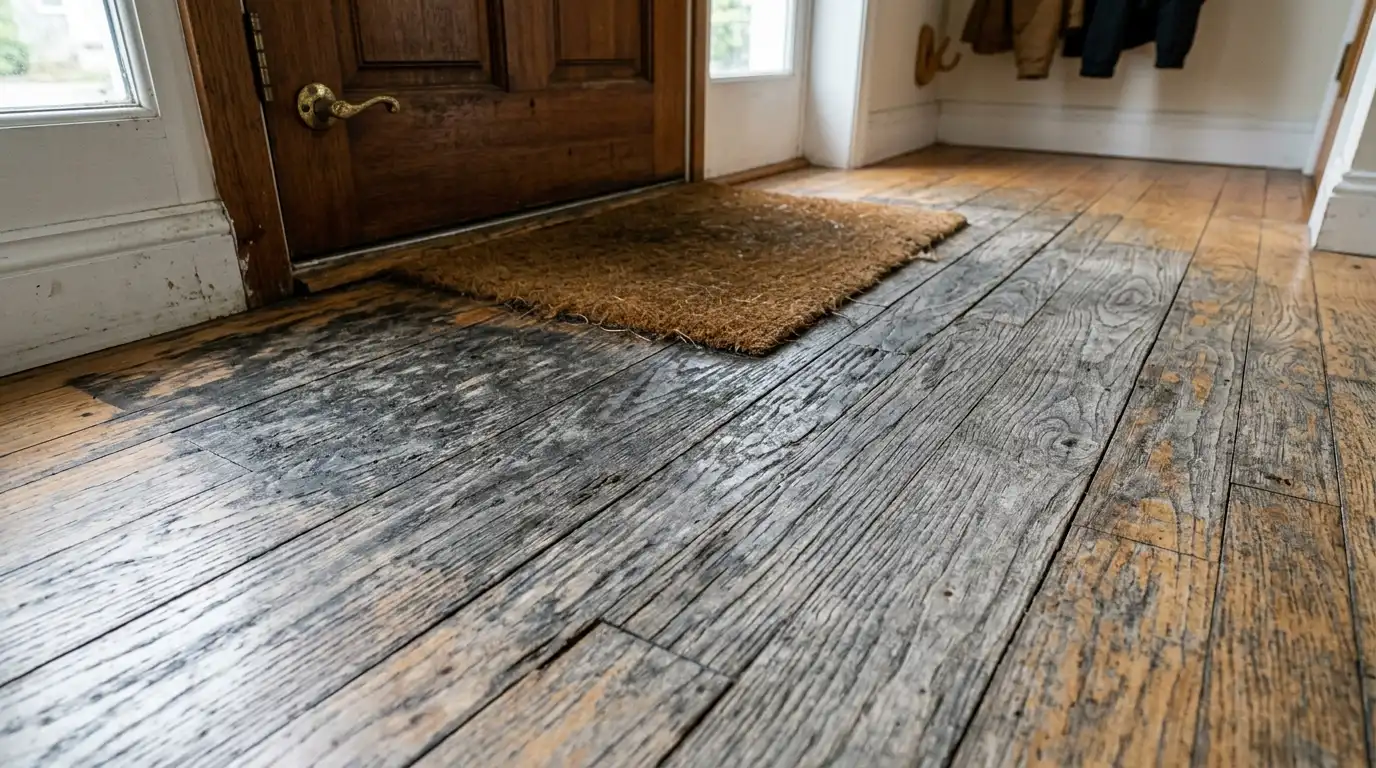
The most definitive signs your timber floors need sanding include a failed water droplet test, deep scratches that penetrate the protective clear coat, greying or blackening wood, and persistent dullness that no amount of cleaning can fix. In Melbourne, where homes endure intense summer UV rays and wet, muddy winters, staying vigilant about the condition of your floorboards is essential. Identifying the signs for floor sanding and polishing early not only saves you from expensive structural repairs down the track but also revitalises the aesthetic appeal and value of your entire property.
| Sign of Damage | Key Info & Testing | Why It Matters |
|---|---|---|
| Failed Water Test | Water soaks into the wood instead of beading up on top. | Indicates the polyurethane coating has completely worn away. |
| Deep Scratches | Gouges that expose raw timber, often caused by pets or furniture. | Leaves the wood vulnerable to moisture rot and permanent staining. |
| Greying or Blackening | The timber fibres are turning grey, black, or splintering. | A critical warning sign of water damage and severe oxidation. |
| Fading and Sun Damage | Distinct colour differences where rugs or furniture used to be. | UV damage compromises the visual uniformity and value of the floor. |
Identifying the Key Signs
Recognising the signs your timber floors need sanding is all about understanding the relationship between the raw wood and its protective polyurethane coating. Hardwood floors are not impenetrable, and are dependent on their topcoat’s clear finish for protection from moisture, dirt and everyday traffic. This can wear down and leave the wood at risk from the weather.
1. The Water Drop Test Success
The most simple and effective test to see if your floors require a full restoration is to conduct a water drop test. Spread in 1 tablespoon of water on a high traffic spot on your floor (hallway, kitchen, etc.). If the water does bead up and sits on the surface, your finish is still in place. The protective seal is completely lost if the water slowly absorbs into the wood and darkens the wood. The quick sanding and polishing is needed to avoid permanent water damage in this case.
2. Deep Scratches and Gouges
As with everything else, surface scratches are part and parcel of life, particularly if you have a busy family. But a scratch which catches deeply when you run your fingernail over it or a raw lighter-coloured wood that can be seen under the finish is huge red flag. Simple mopping will not suffice for deep gouges formed by pushing heavy furniture without felt pads or large dogs running in the house. Because these gouges retain dirt and moisture, it is important to aggressively sand them flat and re-seal them.
Bunnings notes that “timber floors can become scratched, dull or uneven from everyday wear and tear,” making these some of the clearest signs that sanding may be needed.
3. The greying or blackening or discolouring.
Once the polyurethane is fully removed, water from wet shoes, mishaps or even harsh mopping enters right into the timber’s cells. This continuous moisture leads to oxidation of the wood fibres and leaves the wood with a dull, ashy grey colour or in extreme cases, a black colour. One of the earliest indications that it is time to sand and polish a floor is gray patches that are starting to appear in the high-traffic areas. Untreated, the wood will rot and will need to be replaced as a whole not sanded.
4. Splintering and Gapping
The floor surface should be smooth with bare feet. If you are seeing any rough spots, peeling or, even worse, if you or your kids are picking up splinters, the board is already compromised. Wood is drying, cracking and starting to split.
5. Shearing of the crowns from the trees
If the floor is greying, the coating has already worn off. If it has a bubbling or peeling one, it’s telling you that it is failing right now. If moisture penetrates under the coating before it can evaporate, the contact between the coating and the wood is disrupted, causing the coating to bubble up or peel in patches, typically near the kitchen sink or the place where moisture can stay for too long. When left unchecked, the water on the surface will seep into the gap between the finish and the wood, creating a breeding ground for mould. If there are any areas visible or felt for lifting, flaking or bubbled, it is not too soon to consider booking a sand, even if it is not spreading throughout the room.
6. Stubborn Stains that refuse to lift.
Not all marks are scratches. Underneath stains, from pet urine to metal furniture legs that have been left too long over a damp area, to an old plant pot ring or a forgotten glass of wine can all be underneath stains that are not on top. A penetrating stain is one that does not respond to mopping, scrubbing or even a good wood cleaner. The marks are now embedded within the fibres of the wood itself and can’t be moved by “scrubbing the surface”. In most cases, sanding back to bare wood is the only method that will help to remove them, and for very stubborn or dark stains, it may also be necessary for the professional to determine if the localised wood needs to be bleached or if the whole board needs to be replaced before refinishing.

Complete Sand vs Recoat?
You don’t need to do it to all tired looking floors; knowing the difference will save you a lot of money. If your coating is dull and not damaged – no bare wood, no deep scratches and water beads as normal as opposed to soaking – then a screen and recoat is often the solution. This is a process that gently buffs the current surface and coats it with a new top coat, but does not remove any timber. It is means easier, less expensive and much less disruptive than a full sand.
A full sand and refinish is required when the protective layer has worn down over an extensive area, e.g. bare wood in high traffic areas, scratches show through to raw wood, staining has shown through the grain or previous sanding is dull rather than peeling.
If you have engineered wood floors, one other question you should ask before you sand the whole floor is how many times has the floor been sanded thus far? Although solid timber can generally support multiple full sands throughout its life, engineered boards generally have only a hardwood veneer, typically 3-4mm thick, over a plywood or HDF core. Increased heavy sanding or repeated sanding will risk peeling the veneer completely away, leaving the wood beneath. When you have no idea how many times your floor has been sanded before, it’s best to hire a professional to assess your floor before work is started to avoid any issues with your investment.
How Often Should Melbourne Floors Be Sanded?
There’s no single rule, since wear depends on timber species, finish quality, and how hard your household is on its floors — but as a general guide, most Melbourne homes fall into one of three bands. Lightly used rooms such as formal living areas or spare bedrooms can often go 10 to 15 years between sands. A typical family home with moderate daily traffic usually needs attention every 7 to 10 years. High-traffic zones — entryways, hallways, and kitchens, especially in busy households with kids or pets — tend to show wear faster and may need sanding closer to every 5 to 7 years. If your floor is showing the signs above well ahead of these windows, don’t wait for the “right” year on a calendar — the timber itself is telling you what it needs.
Benefits of Timely Restoration
Waiting for the time when you recognise your timber floors require sanding is a huge mistake. While many homeowners procrastinate the inevitable process simply because they are afraid that it will cause a lot of mess, the consequences will be far more costly if they delay the inevitable.
Avoiding the risk of losing your investment.
Solid timber floors are one of the most valuable characteristics of a property. This is just taking off one millimeters of wood surface and putting a new protective coating on it. Once wood becomes rotten, cuped or warped, you are going to have to spend the money for demolition, new raw materials, installation, and finishing. Sanding is a very affordable maintenance practice that can help keep your home safe and sound for generations to come.
Significantly reducing air pollution.
Over time, dust mites, bacteria, pet dander and pollen get trapped in the small gaps of heavily scratched and gouged floorboards. Regardless of the frequency with which you mop or vacuum, you just won’t be able to get rid of all of the debris that is stuck in the damaged wood. Sanding the floors perfectly flat and finishing them with a quality, non-toxic floor finish, results in a completely hypoallergenic floor – a significant benefit to asthma and allergy sufferers.
Complete Aesthetic Transformation
One great aspect of recognising the indications for floor sanding and polishing is the design opportunity it offers. But when you’re tired of the yellowish, shiny look of the early 2000s, a full sand is the way to get the boards back to their natural raw state. Then, a modern water-based matte finish, a dark walnut stain or a minimal lime wash can be applied. It’s like installing a brand new floor with no brand new installation costs.

Common Problems or Mistakes Homeowners Make
With floors that start to grow old, there is a tendency for homeowners to panic and implement an immediate solution that can cause greater harm than benefit.
1. Applying “Restorers” and Acrylic Polishes from the supermarket to wood.
If individuals see their floors appear tired, they are apt to rush to the supermarket and purchase heavily marketed “wood restorers” and/or acrylic based liquid polishes. These products are really bad. They only apply a thin, shiny plastic layer to the dirt and scratches. With time, this acrylic starts to accumulate, fog up and starts to peel off in unseemly sticky flakes. In addition, if you do hire a professional, you will have to pay them more to vigorously remove all the synthetic chemicals they have accumulated before they can start sanding.
2. The “Rug Cover-Up” Strategy.
One of the most common pitfalls is to purchase a huge rug to obscure a space where the floor is going dull or has deep scratches. Out of sight, out of mind, but under the rug, it will continue to build up damage, especially if there is a moisture problem that is causing deterioration of the wood.
3. Trying to do a do-it-yourself sanding job.
It all looks so simple to sand a floor on home improvement shows. Actually, years of muscle memory are needed to become proficient with a walk-behind drum sander. The machine is extremely heavy and powerful. If you wait even a second after the drum begins to spin, you’ll make a very large hole in your floor boards, which will destroy them on the spot. The expense of fixing a do-it-yourself sanding job that went wrong is nearly always more expensive than having it done professionally from the beginning.
How to Do It Right
Once you notice the warning signs, you will need to prepare for the professional restoration that will produce a perfect outcome. Here’s how to make it as smooth as possible.
Visually check high traffic areas on a regular basis.
Don’t only consider the bottom of your dining table because nobody walks there. The first areas to suffer damaging failure will be the kitchen (in front of the sink and fridge), the main entrance hallway and around the external doorways. Be sure to periodically inspect these areas for leaks every few months with the water drop test.
Take into account the kind of end you desire.
Obtain information on floor finishes before arriving at the site for sanders. Oil-based polyurethanes give off strong chemical odours (VOCs) and can take days to dry, creating a rich amber colour. Today’s water-based polyurethanes are environmentally friendly, dry quickly and are clear. When replacing your flooring with a new installation, it’s important to consider how the new material will blend in with the existing floor. If you’ve installed a new timber floor and are thinking about installing parquet flooring supply hawthorn, you’ll need to make sure the new material matches the existing finish.
Prepare Your Home Property
For sanding floors, the area must be completely devoid of any objects. All furniture, rugs and window coverings must be removed from the rooms to be treated. If you reside in a multi-story home, you need to be ready to deal with some disruption, too, because floors won’t be walkable during the curing process for the protective coats.

When to Hire a Professional
When deep scratches, greying wood, or a failed water test are noticed, the time has come to drop the mop and dial the phone number. Timber flooring is a luxury product and DIY-repair is a very dangerous idea when it comes to major damage.
The master tradesperson brings a fully functional industrial, dustless sanding machine to your property; walls, light fixtures, and lungs will not be covered in a thick layer of toxic wood dust. They have been able to determine exactly the amount of pressure that can be applied to remove the damage while keeping the thickness of the board intact. When you hire a Floor Sanding and Polishing Melbourne service, you can rest easy and ensure your floors are restored and protected for years to come.
Looking to get your floors back to life?
Don’t wait till the wood starts to rot, if they are looking dull, scratched, or sun damaged, you will want to make your timber floors look better. Our specialties at Boss Timber Flooring are identifying your timber’s exact needs and offering master-crafted restoration services. Whether it’s a precision dustless sanding or the application of the finest and most durable modern finishes, we promise to restore luxury and life to your Melbourne home. Call us today for a no-cost, no-pressure quote and have us create your old boards into a stunning interior wonderland.
Caring for Your Floors After Sanding and Polishing
A freshly sanded floor is at its most vulnerable in the weeks right after the job is done, so a little extra care early on pays off for years afterwards. Hold off on placing rugs or heavy furniture back for at least two weeks, since some finishes need up to a month to fully cure underneath. When you do bring furniture back, use felt pads under every leg and avoid dragging anything across the surface. Stick to a barely damp mop rather than a wet one — standing water is exactly what caused the damage you just paid to fix — and vacuum regularly with a soft-bristle attachment for the first week or two to clear any lingering dust. Treated this way, a professionally restored floor can comfortably go a decade or more before it needs your attention again.
FAQs
1. What are the earliest signs your timber floors need sanding?
The earliest signs include a lack of shine, minor surface splintering, and the failure of the water drop test (where water soaks into the wood instead of remaining beaded on the surface).
2. Are deep gouges and scratches signs for floor sanding and polishing?
Absolutely. If a scratch is deep enough to catch your fingernail or expose the lighter, raw timber underneath, it means the protective seal is broken and the floor requires a professional sand and polish to prevent permanent moisture damage.
3. Why are my floorboards turning grey, and do they need sanding?
Greying or blackening wood means the polyurethane coating has completely worn away, allowing water to soak in and oxidise the timber. This is a critical sign that immediate sanding and polishing are required before the wood rots.
4. Can I just polish my floor instead of sanding it?
If your floor only has very light surface scratches in the top clear coat, a “screen and recoat” (buffing and adding a new layer of polish) might suffice. However, if the scratches reach the raw wood or the colour is faded, a full sanding is mandatory.
5. How do I know if I need a full sand or just a recoat?
If the coating is dull but still intact, with no bare wood and water still beading on the surface, a screen and recoat is usually enough. A full sand is needed once bare timber is visible, scratches reach raw wood, stains have penetrated the grain, or the finish is peeling rather than simply worn.
6. How often do timber floors in Melbourne need sanding?
It depends on traffic and location within the home. Lightly used rooms can go 10 to 15 years between sands, an average family home usually needs it every 7 to 10 years, and high-traffic areas like entryways and kitchens may need attention every 5 to 7 years.


2 Responses
My timber floor still looks dull even after cleaning, but the scratches aren’t particularly deep. Would a light sanding be enough, or would the whole floor usually need to be sanded back?
If the timber is structurally sound and the scratches are mainly within the surface finish, a full sand-back may not always be necessary. Depending on the type and condition of the existing finish, a light abrasion or screen-and-recoat can sometimes refresh the surface and improve its appearance.
If the scratches have penetrated deeply into the timber, or the finish is badly worn or uneven, a more thorough sanding may be required. It’s worth having the floor assessed first, as